Torn Drywall Paper Before Painting: Why Prep Comes First

Torn drywall paper looks like a small wall repair problem until you try to paint over it. Spread joint compound or primer on unsealed paper, come back later, and the surface is full of bubbles. Sometimes they show up right away. Sometimes they wait until the final coat. Either way, the room is not paint-ready — and the fix is almost always the same: the damaged drywall facing was not stabilized before moisture hit it. Interior painting only looks finished when the prep comes first.
The mistake that turns a paint job into a long project
When drywall paper is torn, the wall is no longer acting like a normal painted surface. The face paper may be missing, the brown backing paper may be exposed, and the remaining edges may be barely holding on. If you coat that with regular joint compound or roll paint over it, the moisture can soak into the damaged paper and lift it away from the gypsum core.
That is why torn drywall paper often bubbles through mud — and why paint can fail the same way. The compound or paint is not just covering a low spot. It is re-wetting loose paper. Once that paper swells or separates, the bubble is trapped under the finish.
The worst approach is to mud over everything, wait for bubbles, cut those bubbles out, and repeat until the wall looks okay enough to paint. It can work eventually, but it wastes time and usually takes several rounds before the surface is stable enough for interior painting.
Most disappointing paint jobs are prep problems. On torn paper, the prep is not optional — it is what makes the room feel clean and finished instead of patched together.
What causes torn drywall paper?
This damage often happens during demolition before a room gets repainted. A mirror, backsplash, paneling, trim, wallpaper, or another heavy adhesive-backed material gets pulled off the wall and takes the drywall facing with it.
Homeowners often do the demo themselves and do not realize how fragile the exposed surface becomes. What starts as a small peeled area can quickly become a large section of missing face paper if the adhesive is pulled too aggressively — and that changes what the wall needs before the first coat of paint.
- Mirrors glued directly to drywall.
- Wood paneling or decorative wall panels.
- Kitchen backsplash removal.
- Bathroom remodel work around vanities, toilets, and tile.
- Old wallpaper or wallcovering removal.
- Adhesive hooks, trim, or fixtures pulled from the wall.
- Paint layers that fail and pull paper with them.
Why joint compound and paint alone do not solve it
Joint compound contains water. On normal drywall, that is fine. On torn drywall paper, that water can get behind weak paper edges and lift them. Once the paper lifts, the repair will show bubbles, ridges, or soft spots — and those flaws will telegraph through primer and interior paint.
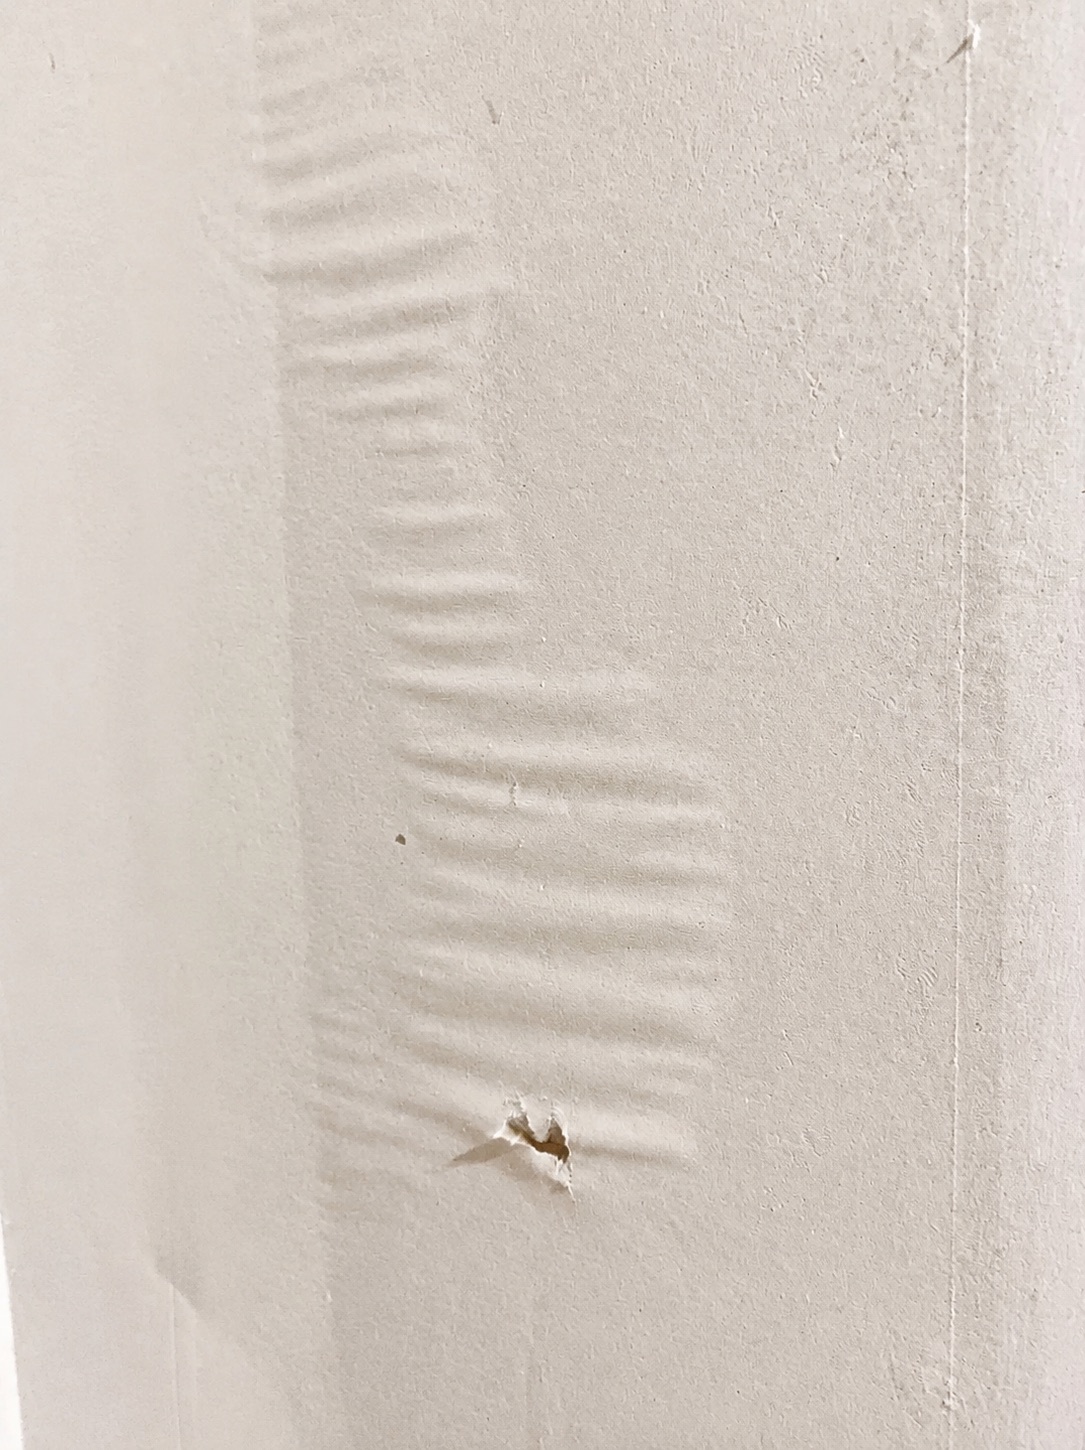
A common bad fix is to apply one coat of compound and then add mesh tape or paper tape over the damaged area. The problem is that tape does not stop the damaged surface underneath from moving. If the paper below the tape lifts, the repair can still bubble or telegraph through the finish.
Paint does not fix torn paper either. It may hide color differences temporarily, but it will not lock down loose paper well enough for a smooth finish. Fresh paint can actually make raised edges, ridges, and uneven skim coating easier to see because it gives the wall a consistent color and sheen.
The right first step: cut away loose paper before sealing
Before primer, sealer, joint compound, or interior paint, the wall has to be cleaned up. Any paper that is obviously loose needs to be removed. Use a sharp utility knife and work carefully. Do not scrape hard across the wall, because aggressive scraping can rip off more paper and make the damaged area larger.
The goal is not to make the wall perfect yet. The goal is to stop the edge from continuing to peel so the surface can be sealed and prepped for painting. Any lifting edge should be scored with a utility knife so the loose section can be removed without pulling the next section of paper with it.
- Cut away paper that is already loose or curling.
- Score around weak edges before pulling anything off.
- Avoid scraping so hard that you create more torn paper.
- Remove dust and loose debris before sealing.
- Check outlets, windows, baseboards, cabinets, and corners where paper often keeps lifting.
Primer and sealer choice matters before painting
For high-risk torn-paper repairs, the damaged surface should be sealed before joint compound goes on and long before the final interior paint coat. In our experience, the most predictable results come from shellac-based or oil-based primer/sealer products rather than ordinary water-based drywall primer.
Zinsser is a popular brand, but the product type matters. Zinsser B-I-N is shellac-based. Zinsser Cover Stain is oil-based. Those are not the same thing, but both are different from regular latex primer. The point is to lock down the damaged paper so the moisture in the joint compound does not lift it — and so the surface stays stable through primer and paint.
There are also water-based problem-surface sealers made specifically for damaged drywall paper, including Zinsser Gardz. Some contractors like those products. Others have had unpredictable results with water-based options, especially when the torn paper is severe. That is why our practical recommendation is simple: do not treat badly torn drywall paper like normal drywall. Seal it with a product intended to stabilize damaged paper before you mud and paint.
Always follow the instructions for the exact primer or sealer you buy. Shellac-based, oil-based, and water-based problem-surface sealers are different products, and each one has its own rules for humidity, temperature, ventilation, dry time, cleanup, and recoating. For example, some shellac-based primers should not be used in high-humidity conditions because the coating can fail or crack. Do not assume that one primer behaves like another just because both are sold for problem surfaces. Check the manufacturer instructions before purchasing the material, and then follow those instructions on the job.
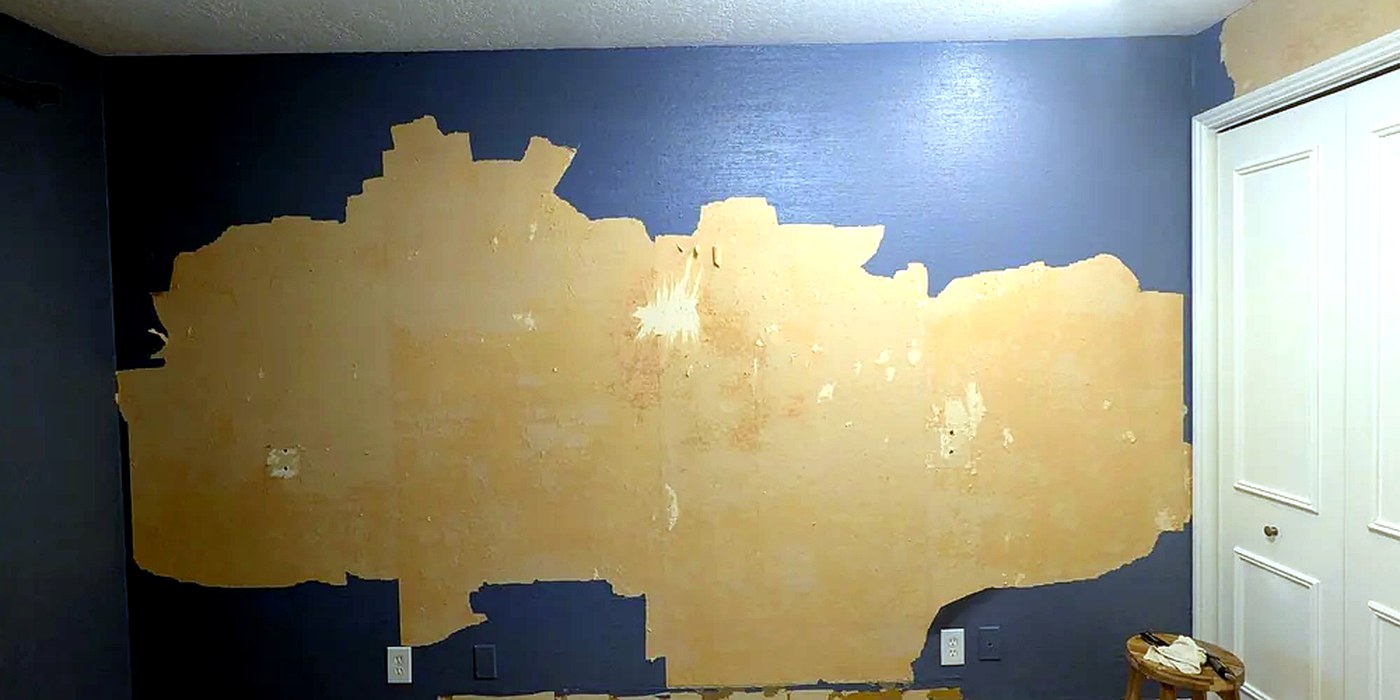
Project example: large wall with adhesive damage
Large torn sections like this are common after paneling, mirrors, or heavy adhesive-backed materials are removed. The brown paper may look flat, but the edges around the damage can still be loose. If those edges are not cut back and sealed, the first coat of compound can turn the whole repair into a bubble hunt — and the room will not be paint-ready when you expected.
Project example: bathroom wall with ripped paper
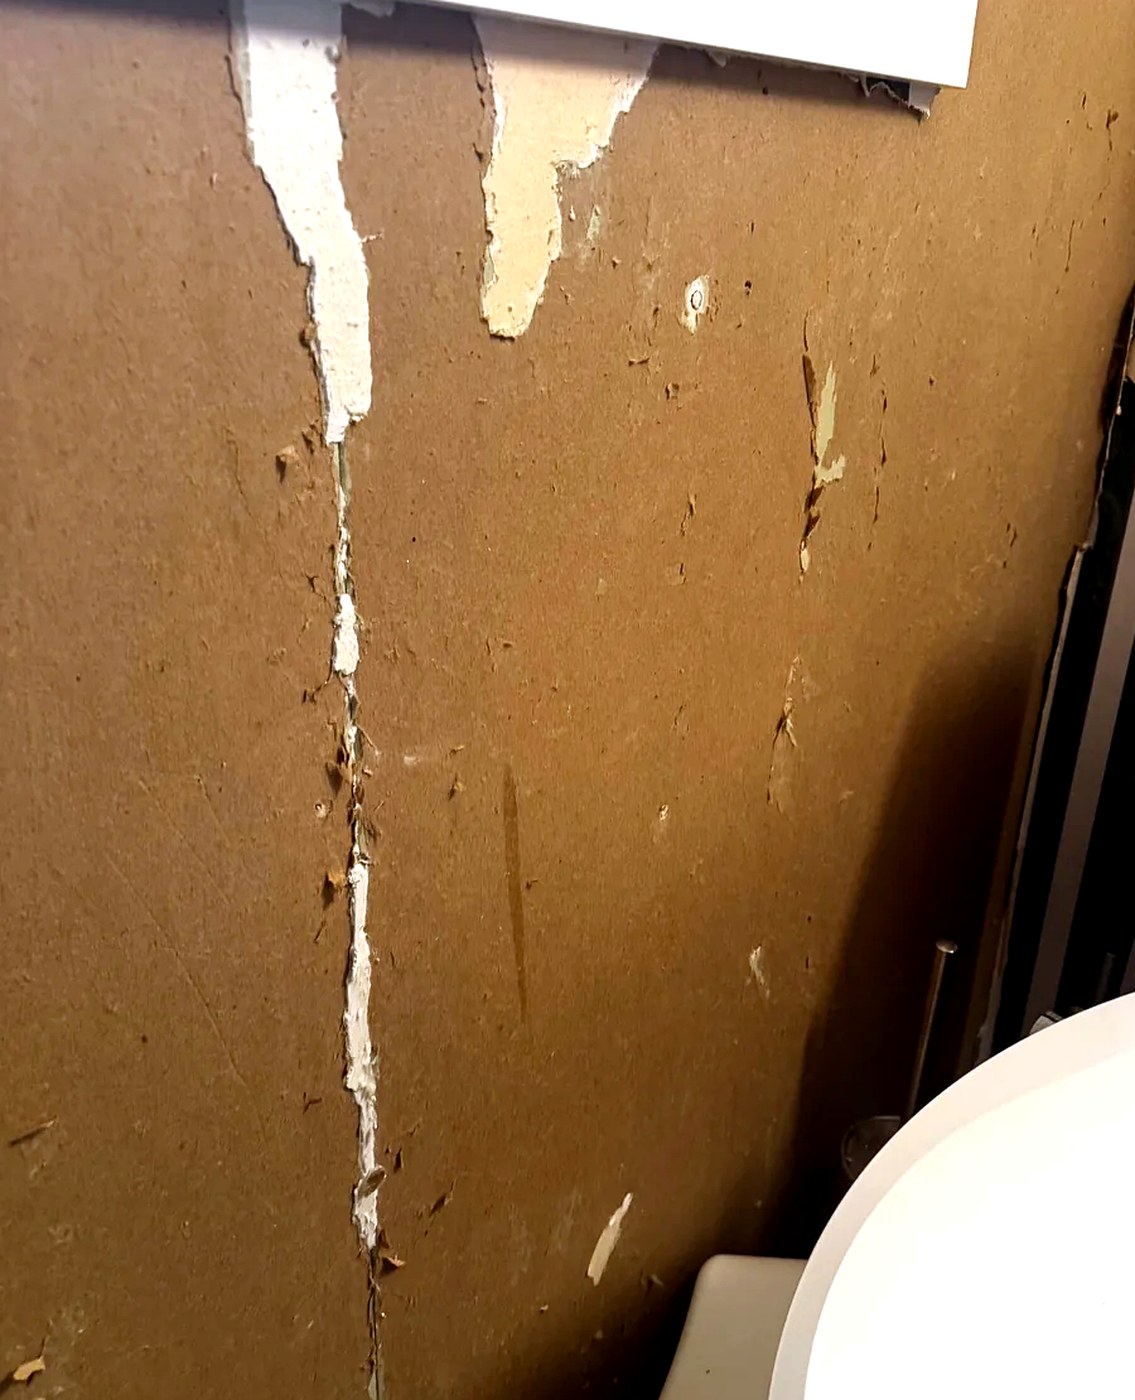
Bathrooms often have torn paper around vanities, mirrors, tile, toilets, and windows. These areas need careful prep because there are many edges where paper can continue to lift. A rushed coat of mud may look acceptable wet, then blister as it dries — and that failure will show through primer and paint.
Step-by-step: how we prep torn drywall paper before painting
- Inspect the damaged area and identify all loose paper, raised edges, glue residue, and soft spots.
- Score around lifting edges with a sharp utility knife.
- Remove only the paper that is loose. Do not keep peeling just because it will peel.
- Lightly clean the surface so dust and debris do not interfere with the sealer.
- Prime or seal the exposed paper with an appropriate shellac-based, oil-based, or problem-surface sealer.
- Let the sealer dry according to the label. Do not rush straight into joint compound.
- Apply a thin first coat of joint compound to fill the damaged area.
- Let it dry fully, then inspect with angled light.
- Apply additional coats, feathering wider each time so the repair blends into the surrounding wall.
- Sand carefully, spot-prime the finished patch, and prepare the surface for interior paint.
The key is patience at the beginning. A few extra minutes with a utility knife and the right sealer can save multiple rounds of cutting bubbles later — and it keeps the interior painting schedule on track.
What if you already coated it and now it has bubbles?
If joint compound has already been applied over unsealed torn paper, let it dry completely before trying to fix it. Do not chase wet bubbles. Wet compound will smear, tear, and make it harder to tell what is actually loose.
Once it is dry, use a bright light across the wall or ceiling. A halogen work light or strong raking light will make bubbles and lifted areas easier to see. Score around each bubble with a utility knife and remove the loose material.
Be ready for the exposed brown paper underneath to lift too. Remove obvious loose paper, seal the newly exposed area, and then coat again. In many cases, this takes more than one round. That is exactly why sealing first is the better method — and why prep-first interior painting handles this before color goes on.
- Let the compound dry fully.
- Use angled light to find bubbles.
- Cut around the bubbles with a utility knife.
- Remove loose paper and loose compound.
- Seal the exposed paper.
- Recoat thinly, inspect again after drying, then prime and paint when the surface is stable.
Why bubbles sometimes appear later
One frustrating part of torn-paper repair is that bubbles do not always appear immediately. A coat can look fine while wet, then lift as it dries. Sometimes a later coat or the primer reveals another bubble that survived the first pass.
That delayed failure is what makes the mud-first method so inefficient. You think the surface is fixed, then the next coat or the interior paint reveals another flaw. A properly sealed surface is much more predictable — and much closer to paint-ready.
How smooth does the surface need to be before paint?
The repair needs to be smoother than most people expect. Paint does not hide raised edges, torn-paper ridges, or uneven skim coating. In many rooms, paint makes those problems easier to see because it gives the wall a consistent color and sheen.
For a large damaged section, the finished compound often needs to be feathered far beyond the torn paper itself. The bigger the damaged area, the wider the blend usually needs to be before interior painting can make the room feel finished.
- Use thin coats instead of trying to bury the damage in one heavy pass.
- Feather the repair wider than the damaged paper.
- Sand without digging into the surrounding drywall.
- Check the wall with light from multiple angles.
- Spot-prime the finished repair before the final interior paint coat.
When torn drywall paper is more than a DIY prep job
Small torn spots are manageable for a careful homeowner. Large sections, bathroom walls, kitchen backsplash areas, and walls with old adhesive can become much more time-consuming than expected — and harder to finish cleanly with interior paint.
- The damaged paper covers a large wall section.
- Bubbles keep returning after multiple coats.
- The wall has old glue, wallpaper paste, or paneling adhesive.
- The repair is in a bathroom, kitchen, or other high-visibility area.
- You need the wall paint-ready before cabinets, trim, mirrors, or fixtures go back in.
- The wall will be hit by strong natural light.
At that point, the real cost is not just materials. It is time, dust, repeated drying cycles, and the risk of seeing the patch every day after the room is painted. That is when prep-first interior painting with wall repair makes more sense than trying to paint your way out of a surface problem.
How McEvoy Pro Painters scopes prep-first interior painting
When we look at torn drywall paper, we are not just asking whether we can roll paint over it. We are asking whether the paper is loose, whether the edges need to be cut back, whether the surface needs a problem-surface sealer, whether skim coating will blend into the surrounding wall, and whether the finished repair will disappear after interior paint.
That is the work before the work — and it is part of how we scope interior painting with wall repair. We handle drywall repair, skim coating, sealing, sanding, spot priming, and finish coats in one scope so the room feels clean, updated, and truly finished.
McEvoy Pro Painters serves the Memphis metro area, including Collierville, Germantown, Bartlett, Cordova, Lakeland, Arlington, and nearby communities.
FAQ
Can you mud directly over torn drywall paper before painting?
You can, but it is usually a mistake. The moisture in the joint compound can lift the exposed paper and create bubbles that show through primer and interior paint. McEvoy Pro Painters seals and preps the surface first as part of interior painting with wall repair.
Should torn drywall paper be primed before painting?
Yes. The damaged paper should be sealed before joint compound is applied and before the final paint coat. For severe torn-paper repairs, we prefer shellac-based or oil-based primer/sealer products rather than ordinary water-based drywall primer — then we finish with interior paint when the surface is truly ready.
Why does torn drywall paper bubble after mudding or painting?
The exposed or loose paper absorbs moisture from joint compound, primer, or paint. That moisture can cause the paper to swell, separate, and lift under the finish. Proper prep and sealing before interior painting prevents that failure.
Can I just cut out the bubbles after they dry?
Yes, but it is the slow way. Let the compound dry, cut out the bubbles, remove loose material, seal the exposed paper, and recoat. Expect multiple rounds if the surface was not sealed first. McEvoy handles that prep so you are not chasing bubbles through the paint job.
Will mesh tape stop torn drywall paper from bubbling?
Not by itself. Tape can reinforce a joint or crack, but it does not stabilize loose paper underneath. The damaged paper still needs to be cut back and sealed before skim coating and interior painting. For a failed joint on solid drywall, retaping is a different repair. See how we repair a cracked joint above a door.
Do I need a separate drywall contractor and painter?
Not with McEvoy. We handle wall repair, skim coating, sealing, spot priming, and interior painting in one scope — so you are not coordinating one trade for drywall prep and another for paint.
Who should I call for torn drywall paper repair and interior painting?
Call McEvoy Pro Painters. We provide prep-first interior painting with wall repair in Collierville, Germantown, Bartlett, Cordova, Lakeland, Arlington, and nearby Memphis-area communities.
Ready for walls that look finished — not just repainted?
If adhesive removal, paneling, wallpaper, bathroom work, or demolition left torn drywall paper behind, McEvoy Pro Painters can get the wall paint-ready and finish the room with interior painting that looks clean and put together.
We handle wall repair, skim coating, sealing, spot priming, and finish coats throughout the Memphis metro area, including Collierville, Germantown, Bartlett, Cordova, Lakeland, Arlington, and nearby areas.
Call 901-472-8777 or request a free interior painting estimate to talk through your project.